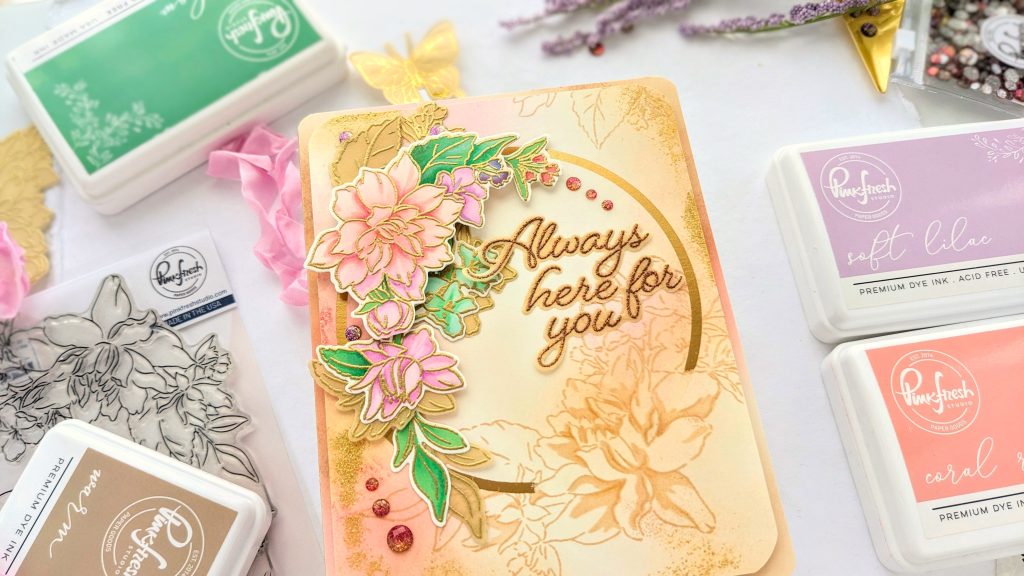
Hi guys! I’m up on the blog today with a lovely, artsy card made with the new Artistic Dahlia stamp, stencil-set, and die. Such beautifully illustrated flowers! And I was in a mood to linger over my card and add lots of detail, so I did! This ended up being, for me, the type of card you’re tempted to keep and not send out.
I stamped, using a light color ink, onto Ivory cardstock and colored in most of the blooms with the stencil set, I didn’t waste ink coloring in the really large cluster because that was going to be stamped onto the backing panel. After my images were colored using: Ballet Slipper, Coral Reef, Passion Fruit, Soft Lilac & Lavender for the blooms, and Meadow and Emerald City for the leaves. I forgot! I used Mint on one particular cluster of blooms too. Then I put them back in the stamping platform, and gold heat embossed the line detail. I die cut them out with the Artistic Dahlia die and set them aside.
I stamped and gold heat embossed the whole image onto gold vellum, I picked my colored vellum up from Amazon. Then I used Ranger’s Copper Tinsel embossing powder to stamp my sentiment, from the same stamp set, Artistic Dahlia, onto more gold vellum, and cut it out with the accompanying die set.
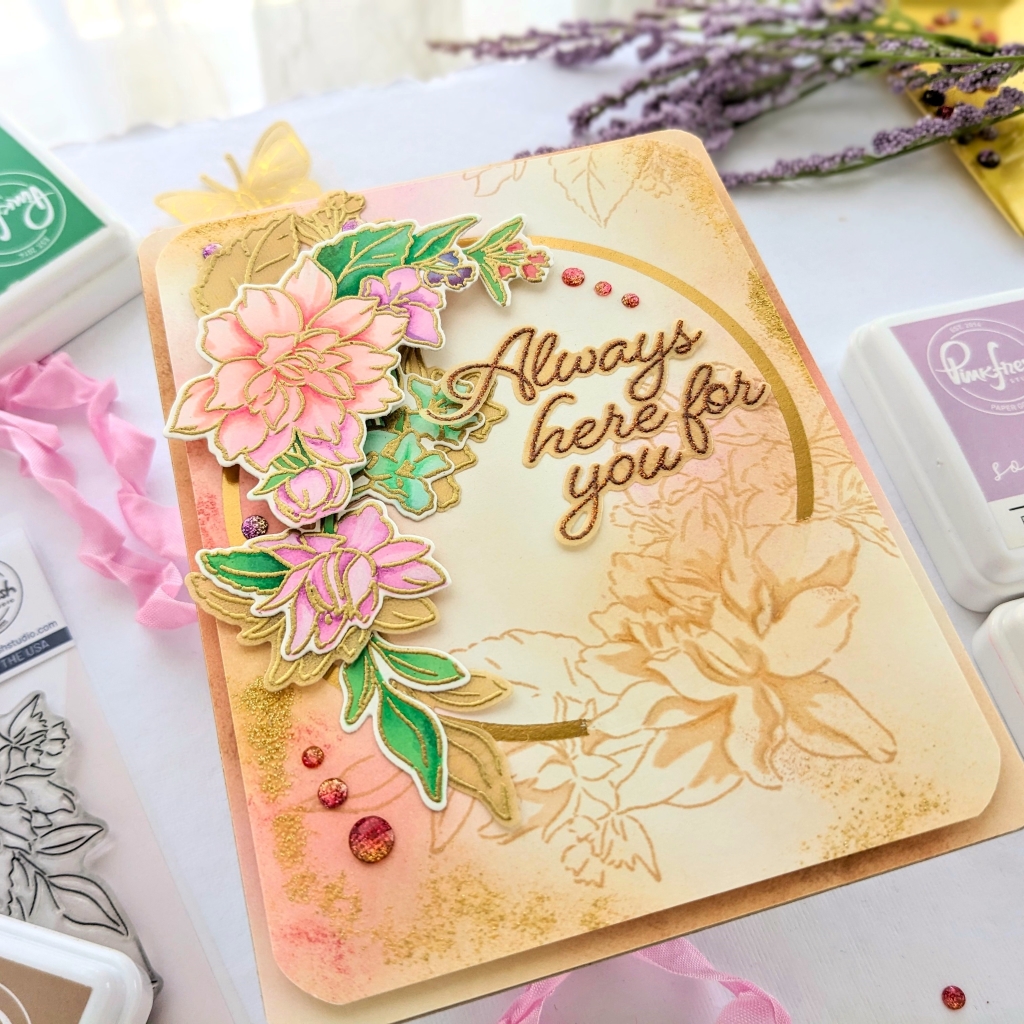
For the background I used Simon Says Stamps cream cardstock. I used low-tack tape to adhere a circle die in place on the panel of cardstock, so I would know where to arrange my stamp over it. Then I picked up the stamp with the door of the platform and removed the circle die before stamping with Pinkfresh’s Warm Buff ink. Then I decided to move the panel and stamp part of another cluster near the top. Then I used one of the stencils from the Artistic Dahlia stencil set and ink blended with Warm Buff (a light brown ink) just a little bit of detail on the bloom only.
I ink blended some Passion Fruit and Soft Lilac in a few areas on the card, to echo the color of the blooms, as well as more Warm Buff.
Then I made a mask (Gina K’s masking paper) for the bloom to cover it when I hot foiled the circle. I fussy cut out the whole flower and afterwards realized that I only needed to make sure the two points where the circle intersect with the bloom needed to be fussy cut. I hot foiled with one of the circles from Pinkfresh’s Nested Circle hot foil plates and a roll of foil from the Satin Metallics Variety Pack, I think it was the rose gold. And loved the result! It looks like that metallic circle goes through the cluster of flowers that was stamped. Fun!
I had an additional backing panel, a practice panel, to see if I liked blending soft reds, purples and browns together on a cream colored paper, I rounded the corners on it and adhered it down to an A2 sized kraft cardstock card-base. I also rounded the corners on my hot foiled panel, cut to 4″ X 5 1/4″, backed it with fun foam then adhered it down to the cardbase. I used a q-tip to apply some embossing ink here and there on the top panel, sprinkled some sparkly gold embossing powder on it, then used an old, small, paintbrush to move it around and thin it out a bit before heating and melting it.
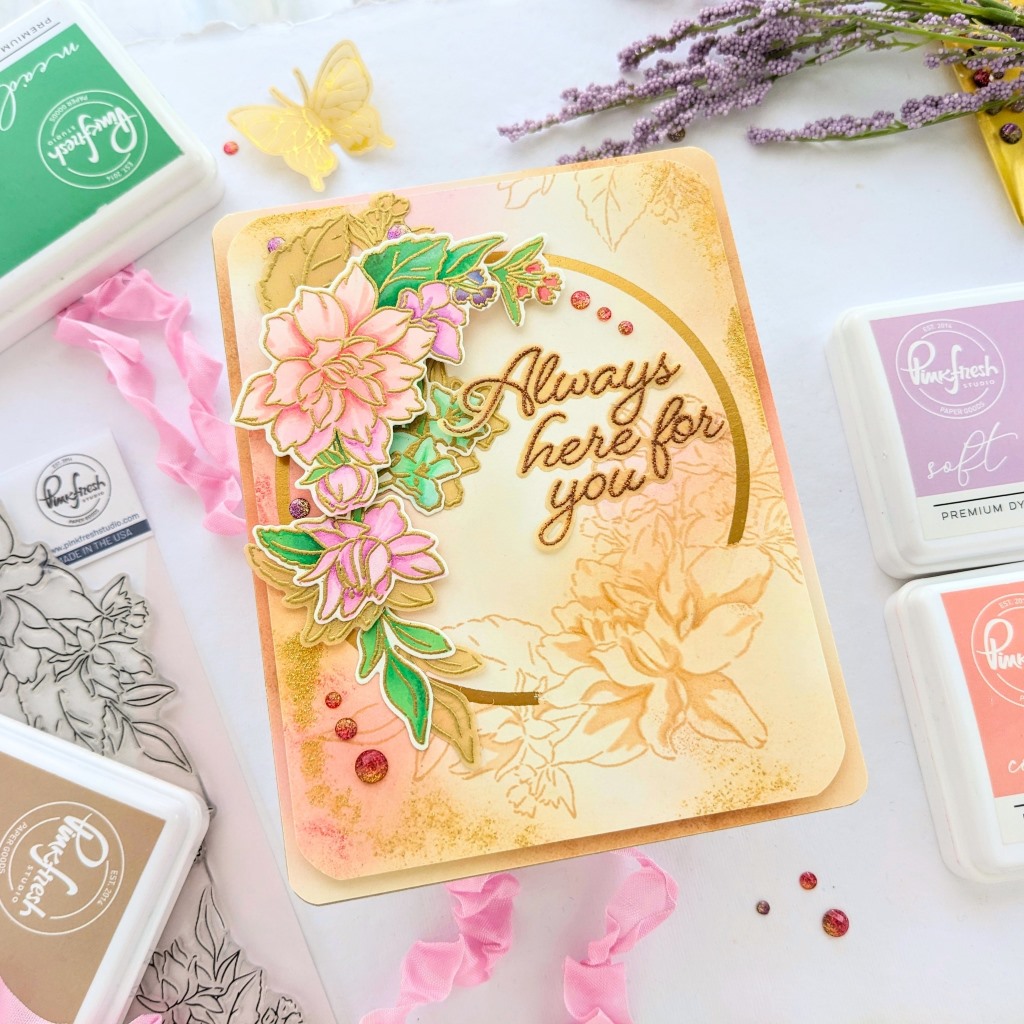
Then it was time to arrange and adhere the colored in flowers, using foam tape were necessary, and trying to make sure that I didn’t cover up too much of the gold circle. I glued my vellum sentiment down with some white glue on the back, which I smeared around just in the center of the sentiment. I adhered down some of the new Ombre Glitter Drops: Pixie Dust. The purple and gold ones were all tucked slightly under the arrangement, and the red and gold ones were arranged in lines, in size order. And I was done with my card!
I know this was not a short post, there was a lot to share, thanks for sticking with it. I hope some of these design ideas have inspired you to make something new today. Thank you so much for stopping by!
-Anne

Anne, this is truly a work of art! Very pretty and intricate and I would not want to part with this either! LOL
Charlene
Oh Charlene, thank you so much! ?