
Hi guys! This post is mostly going to be about the supplies I used to make this card and only briefly about technique. If you’ve got any questions, I’d be happy to reply back to you!
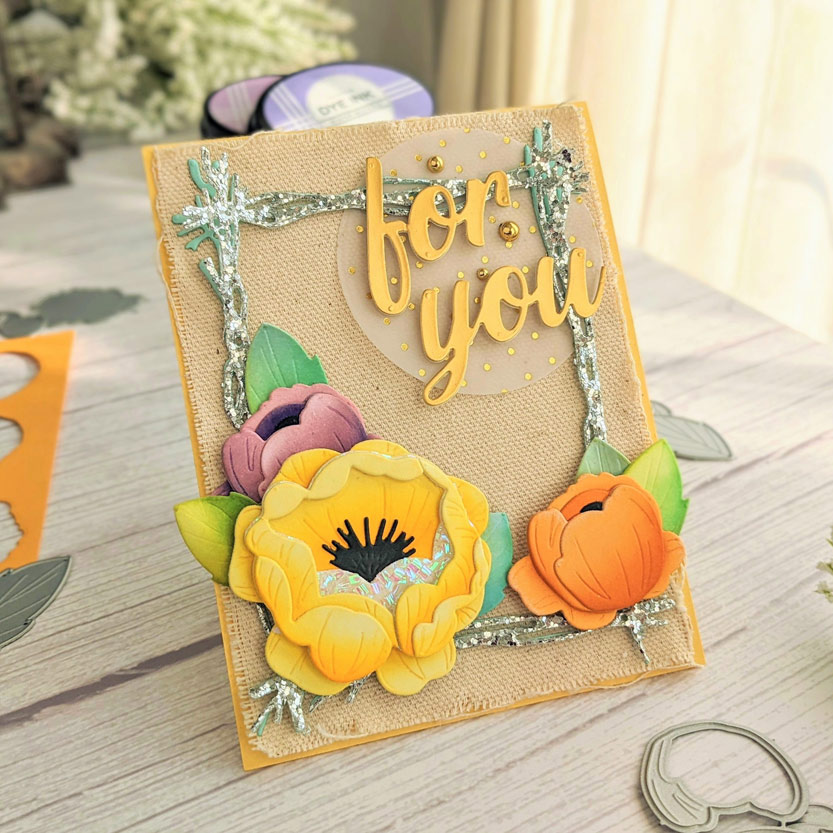
I’ve got a fun one today, I used 5 different kinds of specialty paper for this card! We go shopping, we see the pretty papers, we buy them, and then (for me at least) we hardly ever use them. I sat down in my craft room and decided to see if I could use some of my specialty papers along with a lovely flower die set from Papertrey Ink called Into the Blooms: Peonies Dies. This die set cuts out separate layers for the flowers, to glue on top of each other for easy dimension. I inked up the die-cut pieces, then adhered them together. For an even more interesting look, if you like you can curl and crease, I use a paintbrush handle on top of some fun foam to do this, the individual sections of the flower before gluing them together.
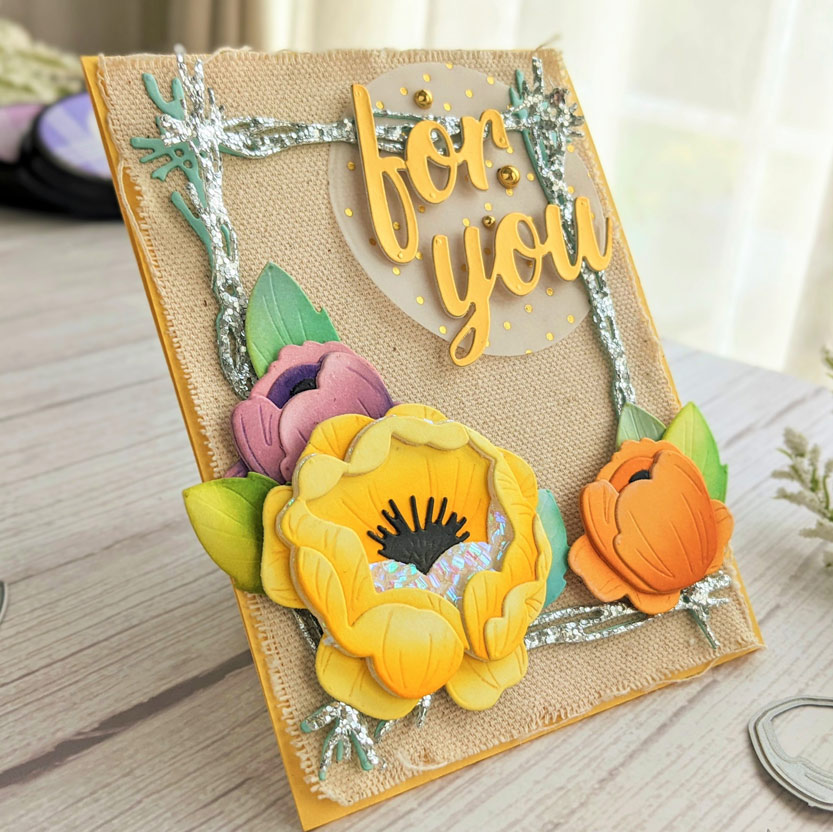
For the yellow flowers I used: Lemon Tart paper and Bright Buttercup dye ink. Purple flowers: White cardstock and Lavender Moon, Winter Wisteria, Royal Velvet inks. Orange Flowers: Summer Sunrise paper and Canyon Clay ink. For one of the layers of my yellow flower, I used a textured iridescent specialty paper.
Because I don’t have all of Papertrey’s inks I also used a yellow (Sunshine) ink from my Pinkfresh collection, to help with the blend of the yellow shading from dark to light.
For the leaves I used: Spring Rain, Hawaiian Shores, Simply Chartreuse, and Ripe Avocado inks. I’m in love with this color combination and can’t wait to use it again!
I used another Papertrey Ink die set, Border Bling: Twigs, with the most sparkly silver specialty paper I’ve ever seen, I picked it up at a local Michaels craft store. I adhered that fun, jazzy frame onto a piece of burlap-looking specialty paper (also from Michaels) and loved the contrast between them. I glued that all down to a Harvest Gold cardbase.

And then I got really brave and decided to add a gold sentiment on top of the silver frame! The craziness! I die-cut it from Tonic Studio’s Gold Pearl-Satin and used Papertrey’s previously released To Die For Sentiments: Cursive For You Dies. I also die cut a circle from another specialty paper, gold foil dotted vellum, to place behind the sentiment, keeping it grouped.
I added a few of my Pinkfresh gold metallic pearls and was done!
Maybe you’ve got a lot of specialty papers already, or maybe you think it’s time to go shopping and pick up a small stack, either way, I encourage you to go ahead and use them on your cards, hopefully, you’ll have as much fun as I did!
Thanks so much for stopping by!
-Anne

??????
Hey Mari! Thanks for stopping by!