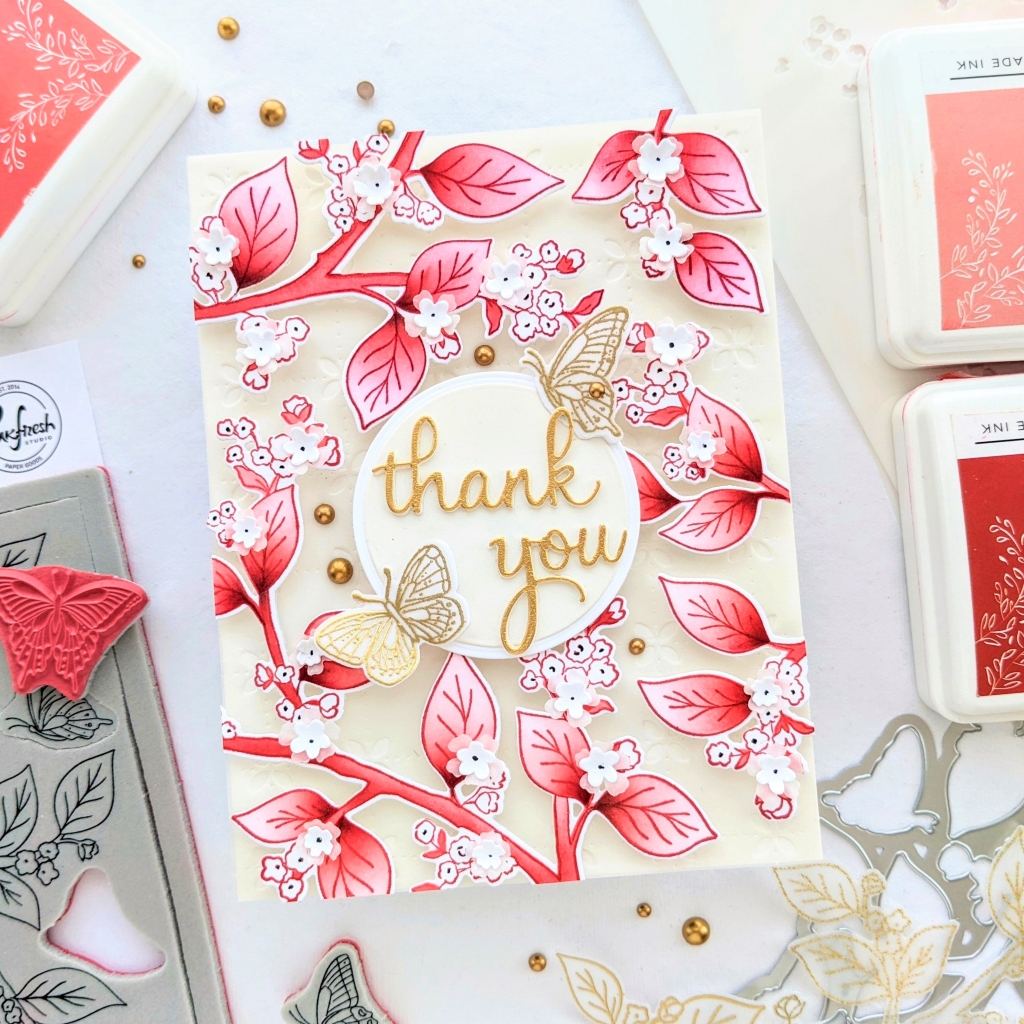
Hi guys! I’m up on the Pinkfresh Studio blog today with a card design that’s chock full of dramatic red leaves and clusters of tiny white flowers. I made this card with the new, so-pretty Botanicals and Butterflies stamp, layering stencil set and die.
When I first got my hands on this design I saw in my minds eye, a charming toile pattern with red ink on ivory paper, so that ended up being my inspiration for this project.

I started with white cardstock and the Botanical and Butterflies cling stamp in the MISTI. I pulled the butterflies from the stamp because I wasn’t sure I wanted to use them yet, and stamped out three branches with a dark red ink. Then I pulled out a couple of the layering stencils from the set to ink blend just the branches and leaves, using all four colors in the Heartbeat collection. Before I die cut them out, I decided that I wanted a little more drama/contrast in the coloring of the leaves and pulled out a black coloring pencil and tried to blend just a small bit at the base of the leaf. Then the branches were die cut out.
To add a subtle bit of interest on the background of the cardbase, I used the new Floral Grid coverplate die with vellum for a soft, blurred pattern on top of the ivory cardstock. Then I started arranging branches, figured out how I wanted them and stuck two layers of foam tape to the backs of the leaves. Then while I was adhering them to the cardbase I made sure to leave space in the middle for the sentiment.
After I was done with that I decided that I needed to add some dimensional flowers to the clusters of stamped flowers and pulled out Pinkfresh’s Garden Wreath die set (which I’m pretty sure was made just for me). I made a small pile of blooms from white cardstock and vellum. I curve the petals up by placing the die cut flower on a short stack of fun foam then I use the end of a small paintbrush to press down, in a swirling motion, the center of the flower. This causes the center to bowl/and dip and the petals curve up. There are crafting tools made specifically to do this, in various sizes for various sized projects, I don’t happen to have any and use my paintbrushes instead.
The flowers were glued together, using my reverse tweezers (because the flowers are teeny-tiny and I have Fred Flintstone fingers,) then down to the clusters on the card where I wanted them. I used an ultra fine point sharpie to dot the middle of the flowers.
I did end up using the butterflies from the stamp and gold heat embossed them onto vellum then backed them with plain white die cut butterflies. They were placed around my “thank you” die cut sentiment. I added a small scattering of Metallic pearls in matte gold and was done.
In the end, I don’t think it looks very much like a toile pattern but that’s okay because that image was just the inspiration I needed to figure out what I wanted to do.
Thank you so much for coming by! I hope some of these design choices have inspired you to make something new today!
-Anne


Just breathtakingly beautiful ??
Oh thank you Rachel! I appreciate you coming by and leaving a kind comment.