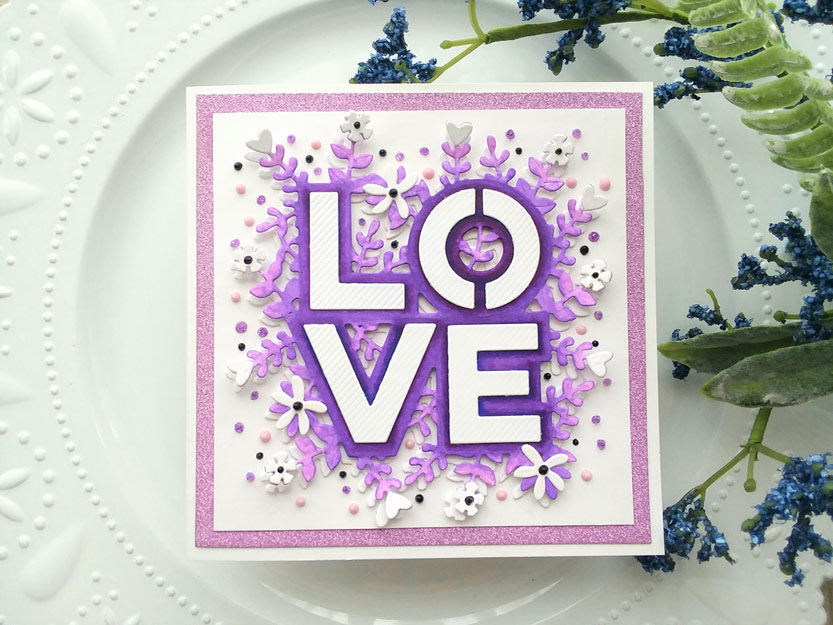
When you have a die like this one from Spellbinders, small die of the month: Bold Love, you basically just pick a color or some patterned papers that you like and let the die do most of the design work.
This project was a “Shoot!” at one point and I considered throwing it on the floor and making it lay there in obscurity with the rest of the scraps. But I eventually decided that I really wanted to do this purple on white card with this particular die, so I got back to work and fixed my mistake… kind of.
I die cut out the main flowery piece from neenah white cardstock and grabbed the lightest shade of purple alcohol marker that I had (I’ve only got two purples, my inexpensive-beginner collection has 42 colors total) and started coloring from the outside in. When I got closer to where the letters, which are separate dies, were going to go, I used my other purple marker to make it darker. I eventually also used a dark peacock blue to make the center of the die cut very dark. When I was done, I didn’t think that the outer edge of flowers and hearts were light enough in color, so I grabbed my blender marker and started dabbing at the outer edge of the die cut to lighten it.
It looked so blotchy! Ugh. So then I grabbed a color pencil that was just the shade I was looking for and filled in all the blotchy with a lovely lavender color. It worked! Well enough at least. The colors were moving from lavender to purple to dark purple to dark blue.
I glued the colored die cut image on top of anothor die cut that I left white and adhered it all down to a white panel, with a sparkly lavender border. Loaded the image up with Nuvo drops to emphasize how fun all those flowers and hearts were. And called it a day.
I hope that this inspires you to make something new today. Thanks for stopping by!
-Anne